A single printable guide for the full Atum Vinyl Ripper workflow, from first setup and recording through Smart Split tuning, restoration, metadata continuity, and final quality control.
Inside this guide
Setup, recording, importing, splitting, tagging, trimming, and export
Smart Split tuning, markers, regions, and restoration workflow
Metadata continuity, quality-control review, and quick-reference shortcuts
Workflow map
From capture to finished export
Set up the session, record or import audio, split and review tracks, apply metadata, commit gain or fades, then finish with restoration and final checks.
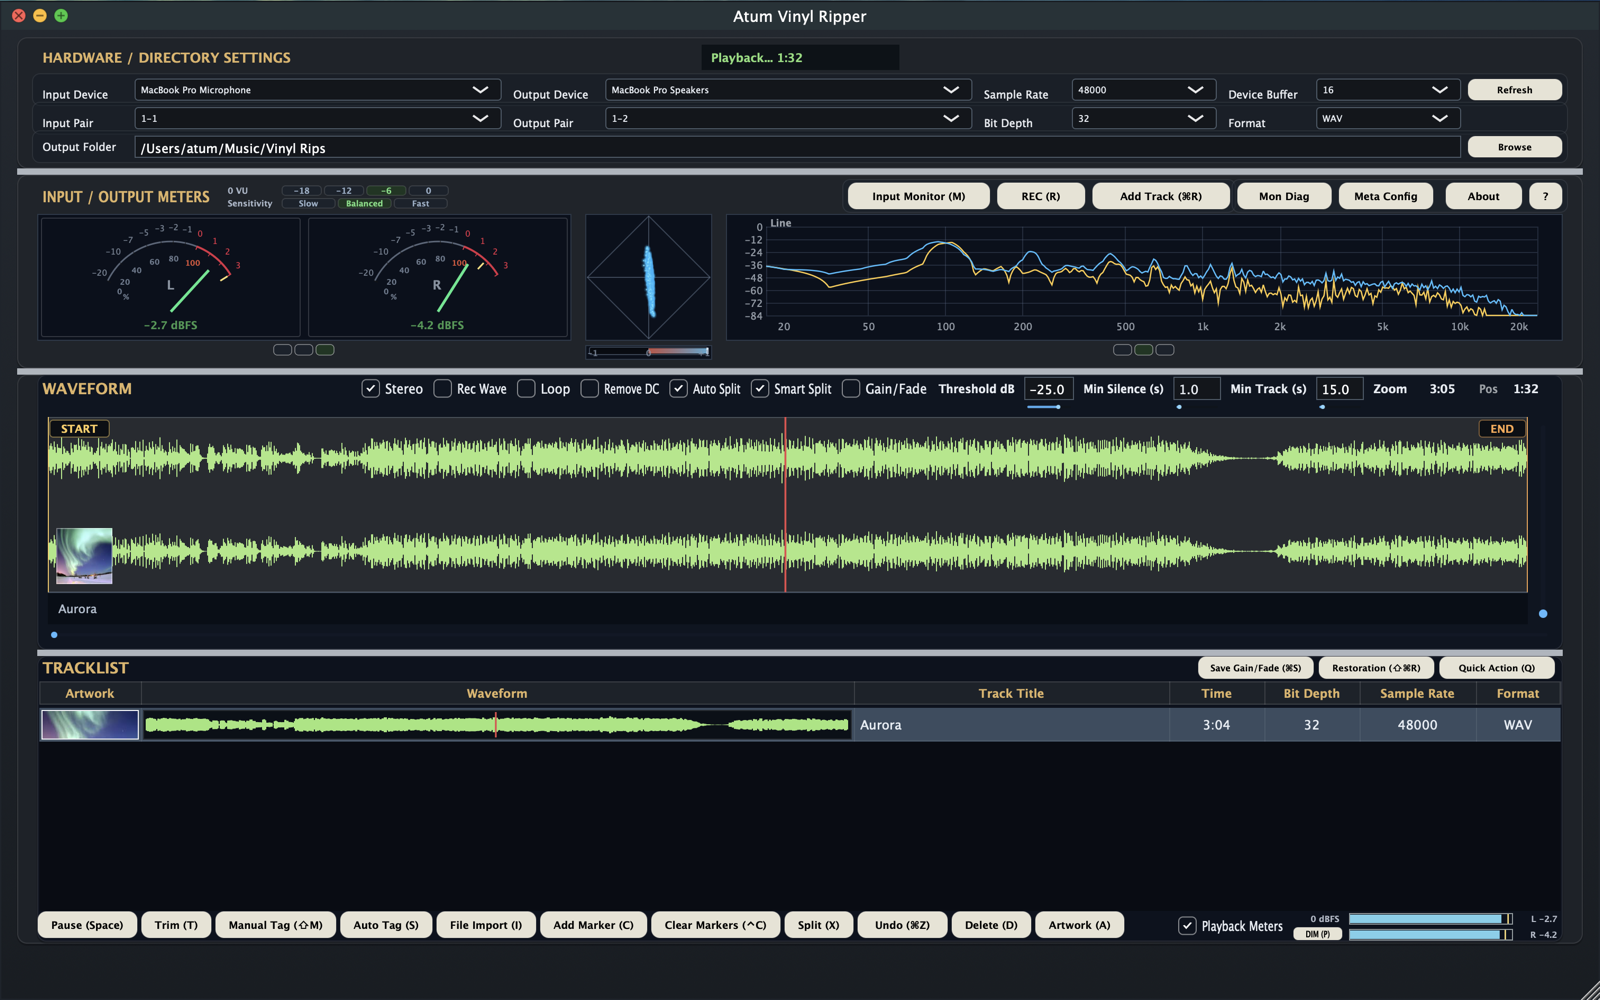
Main workspace showing hardware setup, monitoring, waveform editing, and the tracklist working together.
Section 1
Prepare the session
Set the session up cleanly before recording so every later step stays predictable.
Hardware, format, sample rate, bit depth, and output location are all set before capture begins.
Setup checklist
Select the input device and output device.
Choose the input and output pair you want to use.
Set sample rate and bit depth.
Choose the output format.
Set the output folder so all derived files stay together.
Signal views
Use the meter display that makes the next decision easiest to see.
VU mode is useful for quick level balance checks during setup.Line analysis helps confirm stereo balance and tonal shape before recording.
Before you begin
macOS minimum: Mac with Apple Silicon or Intel processor, a supported macOS release, 8 GB RAM, 1280x720 display, and a CoreAudio-compatible audio interface for stereo 2-track recording.
macOS recommended: Apple Silicon Mac or recent Intel Mac with 16 GB RAM and a dedicated USB audio interface for recording.
Windows minimum: Windows 10 or Windows 11 (64-bit), Intel Core i5 or AMD Ryzen 5 class CPU, 8 GB RAM, 1280x720 display, and a WASAPI- or ASIO-compatible audio interface for stereo 2-track recording.
Windows recommended: Windows 11 (64-bit), Intel Core i7 or Ryzen 7, 16 GB RAM, and a dedicated USB audio interface with native ASIO drivers.
Section 2
Record or import
Bring the audio into the managed workflow either from a live capture or an existing file.
To record a vinyl side
Use Input Monitor to confirm the signal path.
Check the input meters and avoid clipping.
Press R to start recording.
Press R again to stop.
Confirm the new file appears in the tracklist.
To import an existing file
Press I for File Import.
Choose a WAV, AIFF, or FLAC file.
Let the app copy the file into the working output flow.
Confirm it appears ready for editing.
Tip: treat imported files with the same discipline as recorded files so the output folder remains a complete working session.
Input Monitor and REC sit beside the live meters so signal and capture controls stay in the same part of the workspace.
Section 3
Split the side into tracks
Use markers when you want exact control, or Smart Split when you want a faster starting point that you can refine.
Manual markers
Play the side and add markers where tracks begin.
Review the marker layout against the waveform.
Adjust late or early boundaries.
Press X to split into tracks.
Smart Split
Enable Auto Split and Smart Split.
Set Threshold, Minimum Silence, and Minimum Track.
Run detection and review the result visually.
Add manual markers where the auto result still needs guidance.
Smart Split is a starting point, not a final answer. A short listening pass before committing saves cleanup later.
The waveform and tracklist view is where split review, trim control, gain or fade adjustments, and final track order come together.
Section 4
Tag tracks and artwork
Apply metadata before export so the finished files are already organized and ready to use.
Metadata workflow
Select the track you want to tag.
Use ⇧M for Manual Tag or S for Auto Tag.
Review title, artist, album, and artwork.
Correct anything that needs adjustment before sign-off.
Tagging checklist
Artist and track names match the final split.
Album title and artwork are still correct after edits.
Any incomplete rows are reviewed by hand before export.
Good habit
Playback-assisted Auto Tag can help fill incomplete rows while a track is playing, but manual review is still the safe final step before export. Automatic metadata and artwork lookup may use Discogs, MusicBrainz, the Cover Art Archive, Apple's iTunes Search API, and AudD. Short audio fingerprints or samples may be sent to AudD for music identification.
Manual Tag, Auto Tag, File Import, and Artwork all stay on the main action bar for quick access during editing.
Section 5
Trim, commit, and export
Finish the working files cleanly before they leave the session.
Final edit and export flow
Set start and end markers if the track needs trimming.
Press T to trim the selected range.
If you adjusted gain or fades, use ⌘S on macOS or Ctrl+S on Windows to save them into the working file.
Confirm the final tracklist, metadata, and artwork.
Use the exported working files from the output folder.
Envelope changes
The blue envelope line shows pending gain and fade changes. Drag the blue points to shape the curve, then use Save Gain/Fade when you want those edits committed into the working file.
Commit gain and fade changes before downstream actions when you want the blue envelope edit to become the new baseline for later splits, trims, or restoration work.
Save Gain/Fade, Restoration, and Quick Action sit together at the track tools edge so commit and cleanup actions stay close to the tracklist.
Section 6
Tune Smart Split and markers
Use this page for more precise split control on difficult vinyl sides or noisier source material.
Smart Split tuning
Start with a sensible Threshold dB value, then tune from there.
Increase Minimum Silence if surface noise is creating false breaks.
Increase Minimum Track length if short false regions appear.
Review the waveform visually before finalizing the split.
Use manual markers where precise musical boundaries matter more than automatic detection.
Markers
Add markers to force exact split boundaries.
Clear markers and rebuild if the layout drifts.
Review placement while listening, not only visually.
Regions
Create regions for controlled playback and testing.
Use regions before committing trims or restoration changes.
Rename and audition regions when comparing alternate edits.
Smart Split settings live directly above the waveform so threshold, minimum silence, and minimum track changes can be judged against the visible audio.
Section 7
Apply restoration carefully
Start gently, preview whenever possible, and preserve musical detail over aggressive cleanup.
Restoration workflow
Select the target region or track.
Open Restoration from the tracklist tools, or use ⇧⌘R on macOS or Shift+Ctrl+R on Windows.
Enable only the modules you actually need.
Preview or test on a region first for difficult material.
Apply to the full track only when the settings are proven safe.
Use ⌘Z on macOS or Ctrl+Z on Windows if artifacts appear.
Typical modules
Remove DC
High-pass
De-hum
De-click / De-crackle
De-noise / De-hiss
Normalize output
Safe working habits
Use conservative settings first.
Trust your ears over presets.
Check for loss of detail, not only noise reduction.
Preserve the musical result over aggressive cleanup.
Section 8
Continuity and quality control
Do a final review that checks both sound and metadata before you call the transfer complete.
Metadata continuity
Review titles, artist names, album data, and artwork after splits.
Re-check metadata after trim or restoration operations.
Spot-check artwork visibility in the target playback app.
Final review
Verify track order and names.
Listen for false starts, clipped intros, or abrupt endings.
Confirm gain and fade commits where used.
Spot-check exported files in the target playback or DJ app.
Sign-off reminder
A technically clean export is still incomplete if the titles, artwork, or split boundaries are wrong. Check both sound and presentation.
Windows note
Single-key shortcuts stay the same. Where macOS uses Command (⌘), Windows uses Ctrl.
Core shortcuts
R Record / Stop
Space Play / Pause
I File Import
C Add Marker
X Split
T Trim
Finishing shortcuts
⇧M Manual Tag
S Auto Tag
A Artwork
⌘S / Ctrl+S Save Gain/Fade
⇧⌘R / Shift+Ctrl+R Restoration
⌘Z / Ctrl+Z Undo
Before you call the session complete
Review split points before export, not after.
Commit gain or fade edits before downstream processing if they should become the new baseline.
Use restoration conservatively and trust your ears over presets.
Complete Guide for Atum Vinyl Ripper. Use this version as the single printable reference for setup, capture, splitting, metadata, restoration, export, and quality-control review.